Thyme is the proprietary programming language used in Algodoo. It can be accessed using the console by pressing the tilde key (~) on Windows or Mac. It can also be accessed in the Script menu of an object in order to change the code of the object.
Working With Thyme
Thyme is the proprietary programming language in Algodoo. It can change values of objects during the occurrence of certain events. Supported events are:
- onClick - Triggers when the object is clicked.
- onCollide - Triggers when this object collides with another.
- onDie - Triggers upon the deletion of the object.
- onHitByLaser - Triggers if the object is hit by a laser beam.
- onLaserHit - Triggers when the beam of a laser hits an object.
- onSpawn - Triggers every time the object is loaded into Algodoo.
- onKey - Triggers every time a key is used. Without further scripting, this will trigger no matter what key it was.
- postStep - Triggers while the simulation is running according to the HZ level of the simulation.
- update - Like postStep, but it triggers every time, even when the simulation is not running.
Using Thyme to do anything meaningful requires a simple syntax basing on variable manipulation:
variable = value
The variable can either be a global variable, which has properties for the entire scene (written as scene.my.nameHere), or an local object variable, stored inside an object (written as _nameHere).
Note: Writing variables incorrectly will result in the variable being a temporary variable instead of a permanent variable. Writing variables properly will make sure that your Algodoo scenes using Thyme will work.
Any assigned scene.my variable (example: scene.my.theNumber) will be saved in the scene. Loading a scene will load any assigned global variable with its last value.
Using a properties variable of the current scene requires the user to know the name of the variable. An example is scene.camera.pan, which is the name of the variable storing the position of the camera. You can find a full list of property variables here.
There are two ways of using variables inside of objects.
A user can use an already existing variable, which is used for certain attributes of your current object.
e.this.pos = e.pos;
e. - Referring to the data that was collected at the beginning of the event
this. - reference to this object
pos - using the pos variable, which is responsible for the position of an object
= e.pos; - assigning the position at which the event occured to the variable, ending the command with an ;
Note: After each command line, a semicolon needs to be added to mark the end of a command line, unless there is a closing bracket. Visually forcing a new line in a script window requires to press shift+return or control+return. Only return causes the current edits to apply, eventually resetting it when errors exist.
Use custom variables
A user can use custom variables, which can either be permanent or temporary.
_foo = 45;
Creates a new variable called "_foo" if not already created and assigns the number 45 to it.
All permanent custom variables need an underscore (or the "_" symbol) at the beginning of the variable name to identify that it should be saved as part of the object.
bar = e.other.geomid;
Creates a variable called "bar" that lasts until the current scope ends, and assigns the geometry ID of the "other" object (available in onCollide) to it.
Temporary variables are created without any object specification, and only last within the current scope. The scope is the code inside the brackets in which the variable is located. Anywhere outside the brackets that contain the variable is inaccessible.
Note: Writing := instead of = ensures that a variable is created instead of writing to a variable in a larger scope. This is usually used when using the addObject commands to prevent editing both the attributes of the newly created shape AND the object executing the object (i.e. accidentally setting the pos of the executing object as well).
Variable Types
Variables in Algodoo are typeless, meaning they can contain any form of data dynamically without having to cast the variable to a new type. Some basic types used in Algodoo are:
Integer - A number without decimal digits:
_hs = 64;
Float - A number containing decimal digits:
math.pi = 3.14;
String - A chain of symbols, usually as text. Assigned using "":
scene.my.wikia = "Algodoo Wiki";
Boolean - A variable only able to take the state True and False:
_visible = true;
More advanced variables do exist, often containing basic variables in return:
Array - A variable containing multiple values of any type as a list. Assigned using square brackets with every value separated using comma. Values contained inside the array don't have to be of the same variable type:
_data = [1, 3.3, "No errors recorded", [5.5, 2]];
Code - Stores executable thyme code. The code gets executed by placing variable in code. It can also return values:
_code = {e.this.text = "Hello World"};
Function - Similar to Code, except the Thyme code is executable. It is also able to take and return variables. A function gets stored in form of:
(par1, par2,...)=>{code here}
_function = (f, g)=>{f + g};
Code is called as:
var(par1, par2,...):
e.other.pos = [0, _function(2, 3)];
Functions and regular Codes return the value that was used in the last line. In this example, the result of f + g would be the last value used.
This also shows that the events listed above are merely a special type of function, using the parameter e, which contains all information about the event in form of a class.
Classes are the only variable type that can't be made by the user. They act like arrays, with the difference of their content being named variables as well. Their contents can be accessed with the syntax: var.content. While it is not possible to make the variable's classes, as Thyme does not auto-cast to this type, it is possible to edit and even create new variables within an existing class. The only class type variables available to the user is the event data value's "e". Most of Algodoo's global variable organization (scene.my, app.camera, etc.) and variables referring to objects. For example: When copying an object into a textbox, or using entityByGeomId().
Displaying the e-value of an onClick event as text:
ClassObject with children:
clickCount = 1;
handled = false;
pos = [-1.6925424, 0.32110548];
this -> {
    inertiaMultiplier = 1.0;
    resources = [];
    timeToLive = ∞;
    textureClamped = [false, false];
    ...
This also shows the reason why we use e.this..., e.other..., e.pos, etc. When using the event variable. "This", "Other", and often more variables are actually variables stored within the class type variable e, and we access them this way.
OnCollide[]
Changing the Properties of Other Objects[]
Defining the properties of an object that gets hit is often unsuited to the job at hand. First off you should know that density = 10 can also be written as: e.this.density = 10 as this is the more accurate name for this property, but if you wanted to change the density of the object that gets hit by this object you can use this piece of code:
(e)=>{e.other.density = 10}
This will change the density of the object that gets hit to 10.
If-blocks[]
An if statement is a task which can be used to select between two different values depending on a boolean. It is most commonly used to switch between code procedures. The syntax is:
boolean ? value1 : value2;
The question mark, colon, and are required syntax (a semicolon is also required, but only if there are multiple if blocks, in which case you write a semicolon for every line except the last one). The values can be replaced with whatever data you want to put in there.
When an If-statement is executed, the value of the boolean is determined and, depending on the outcome, either compile the first value or the second. Usually said values are code values (written in {}), but other values are possible as well as long as they can be compiled in the current expression. The boolean value is commonly created using logic operators and comparisons, which create a boolean value by comparing multiple values with each other and combining the results afterwards. Existing comparison operators are:
- == - Compares both values to see if the first value is equal to the second value. This is not limited to Integers or Floats. Note: This is different from =, which assigning a value instead of comparing values.
- >= - Compares both values to see if the first value is greater than or equal to the second value.
- <= - Compares both values to see if the first value is less than or equal to the second value.
- != - Compares both values to see if the first value is not equal to the second value. This is not limited to Integers or Floats.
- > - Compares both values to see if the first value is greater to the second value.
- < - Compares both values to see if the first value is less than the second value.
Additionally, boolean values can be combined using logic operators in a way similar to calculation operators.
Existing operators are:
valueA && valueB && valueC... - Is true if both values are true, and false if not, a.k.a. AND-statement
valueA || valueB || valueC... - Is true if at least one value is true, a.k.a. OR-statement
! valueA - inverts the value, a.k.a. NOT-statement
Examples of IF-blocks:
sim.running && e.this.vel(0) < 4 ? {code1} : {}
This script checks sim.running, a variable created in Algodoo, which is stored as a boolean. sim.running gets combined by using an AND (&&), which makes the script also compare the x-velocity of the object and asks if the object 4 meters a second or slower in the x-axis. If both are true, then code1 gets executed, else nothing happens.
_hp <= 0 || _die ? {code1} : {code2}
first the script checks if _hp is 0 or less, and then checks if _die is true. If either is true, it will execute code1, else code2
pos = pos(0) > 0 ? [-2, 0] : [2, 0]
Assigns either [-2,0] or [2,0] to pos, depending on whether the x value is greater or less than 0.
Creating custom Events[]
Since Algodoo's events are basic functions embedded into the source code of the program, one can create their own events embedded into the pre-existing events algodoo provides. A common use of this is to run code if certain conditions are met while keeping the structure of the entire algorithm organized. The following lines demonstrate the use of a custom event onDamage usable for geometries acting as game entities:
_onDamage = (e)=>{
    _hp = _hp - e.dmg;
    e.other._score = e.other._score + e.dmg;
    _hp <= 0 ? {
        timetolive = 0
    } : {}
}
(e)=>{
    e.other.materialname == "bullet" ? {
        // Note the := to force the creation of a new value "dmg" in e
        e.dmg := e.other._dmg;
        _onDamage(e)
    } : {}
}
As can be seen, the event _onDamage is used to extend onCollide without having to place the code in the same event. This helps keeping the code organized and can help accessing such functions in some cases. One does not have to use events for every action, in fact, it's often easier to just use the root Event instead of creating new ones for every task. Major processes in a code should however be seperated in order to easily find and access it.
Changing the world with Thyme[]
You can change the entire scene with Thyme.
For example, you can make the scene run permanently by putting this in update:
(e)=>{sim.running = true}
This causes the scene to never pause. You can use this for a variety of applications. You can also make the scene delete itself if the said object is deleted by putting the following in OnDie:
(e)=>{scene.new}
You can use this for a variety of minigames. For example, "Don't delete the wrong block!" minigames.
List of useful Thyme Variables and Expressions[]
The following list contains a series of Thyme expressions. Should you find that you know code that should belong in this list, feel free to add it as long as it is no duplicate.
- app.camera.* - All camera influencing variables are listed here
- sim.gravity* - All gravity influencing variables are listed under sim prefixed by gravity
- rotation = math.atan2(e.other.pos(1)-pos(1),e.other.pos(0)-pos(0)) - Determines the angle between 2 objects in the coordinate system and rotates the first object accordingly.
- vel = vel + [0,sim.gravityforce]/sim.frequency + [math.sin(*Angle here),-math.cos(*Angle here)]*sim.gravityforce/sim.frequency - Neutralizes the effect of standard scene gravity with the first part and applies new gravity in your specified Angle to the object using the second part. Leave out the 2nd part to achieve zero-gravity.
- rand.uniform01 - Generate a random float integer between 0 and 1, with a random length
- rand.normal - Same as rand.uniform01, but it has a 50% chance to invert the output thus doubling the amount of possible outcomes using negative integers.
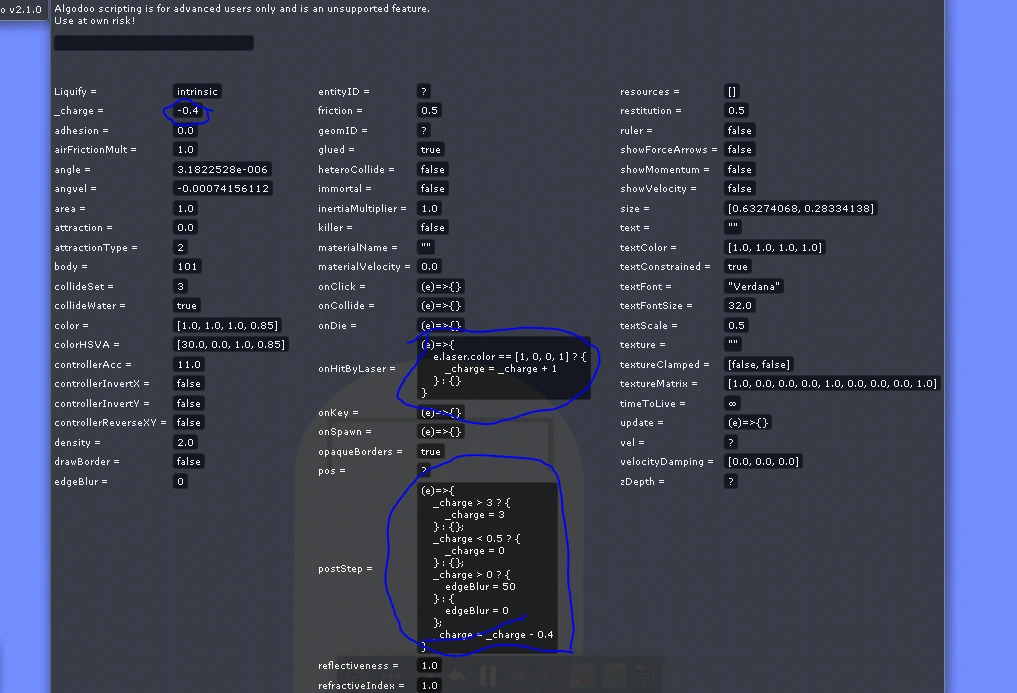
Capacitors[]
A capacitor is a device that holds a small charge and quickly releases it. They can be used in the real world to convert AC to DC, up voltage by turning current from DC to AC, and more.
They're even more useful in Algodoo since capacitors can power light bulbs, batteries, protection circuits, and even more. They're quite easy to make. Put this in your code to create a basic capacitor. Set _charge to 0 and set _action1 and _action2 to the code you want.
postStep:
(e)=>{_charge = _charge = 1;
 charge > 0 ? {_action1(e)} : {_action2(e)}}
onHitByLaser:
(e)=>{_charge = 3}
The scripting menu of the glowing part of an LED by little.
Beginner Scripts[]
Circle Spawner
(e)=>{
    Scene.addCircle{
        onclick = (e)=>{};
        oncollide = (e)=>{};
        ondie = (e)=>{};
        onhitbylaser = (e)=>{};
        onkey = onkey;
        onspawn = (e)=>{};
        inertiamultiplier = inertiamultiplier;
        resources = resources;
        timetolive = timetolive;
        textureclamped = textureclamped;
        adhesion = adhesion;
        attractiontype = attractiontype;
        attraction = attraction;
        texture = texture;
        update = update;
        vel = vel;
        restitution = restitution;
        materialvelocity = materialvelocity;
        showforcearrows = showforcearrows;
        refractiveondex = refractiveindex;
        texturematrix = texturematrix;
        protractor = protractor;
        collideset = collideset;
        drawborder = drawborder;
        reflectiveness = reflectiveness;
        friction = friction;
        materialname = materialname;
        pos = pos;
        density = density;
        colorhsva = colorhsva;
        angvel = 0;
        poststep = poststep;
        edgeblur = edgeblur;
        angle = angle
    }
}
Box Spawner
(e)=>{scene.addBox({size := [0.83575642, 0.27858579]; density := 2.00; pos := e.pos; restitution := 0.5; friction = 0.5; angle := 0})}
Self Collision
(e)=>{heteroCollide = false}
Collide Water
(e)=>{collideWater = true}
Change Collision of other objects or itself
(e)=>{e.this.collideSet = 1} or (e)=>{e.other.collideSet = 1}
Change Shape Color [R,G,B,A] : R=red, G=green, B=blue, A=visibility-attribute: value-range = 0.0 to 1.0
(e)=>{color = [1.0, 0.0, 0.0, 1.0]}
Text Color [R,G,B,A]
(e)=>{textColor = [1.0, 0.0, 0.0, 1.0]}
Text Size
(e)=>{textScale = 3}
Density
(e)=>{density = 10.02}
Attraction
(e)=>{attraction = 50}
To repel - use a negative number with parentheses.
(e)=>{attraction = (-20)}
Killer
(e)=>{killer = true}
Set destroy key (With spawned objects)
(e)=>{buttonDestroy := "e"}
Set Collision (With spawned objects)
(e)=>{collideSet := n} // n is equal to any integer from 0 to 1023
Add Text (With spawned objects)
(e)=>{text := "Hello World!"}
Teleport a Object
(e)=>{e.other.pos[x,y]} //x,y are coordinates where object will be teleported
The statements below are whole-SCENE variables (the variables only exist in one place). So you don't need a colon (:) in front of the equal-sign.
Anti-Gravity
(e)=>{Sim.gravityAngleOffset = 3.1415927}
Pause Simulation
(e)=>{sim.running = false}
Change Zoom Level
(e)=>{scene.camera.zoom = 17.700001}
Change Camera Pan
(e)=>{scene.camera.pan = [-446, 14.6]}
Change Simulation Wind Angle
(e)=>{sim.windangle = 3.1415927} // value is in radians, not degrees
Change Simulation Wind Strength
(e)=>{sim.windstrength = 10} // in m/s squared ---> (m/s)^2
External Links:[]
Another version of the Algodoo Thyme programming language made by Doc671, Woodsie, and Prototype can be found here:
More information about Algodoo Thyme can be found here:
https://wiki.zum.de/wiki/GadApedia/Thyme_algodoo_english
Here's a YouTube video by seth2rock that will help you with simple coding
https://www.youtube.com/watch?v=4LBMZ0Jtyhw
Here's the known syntax of Thyme.